

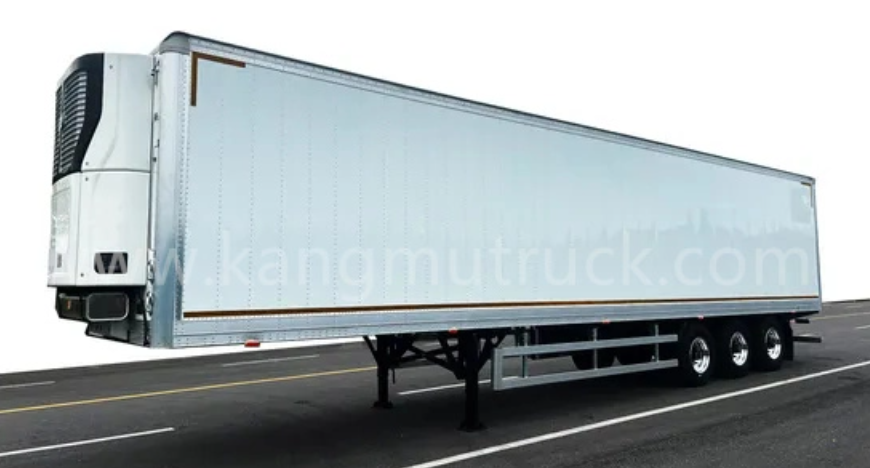
HFV9400XLC Refrigerated Trailer Service Best Practices for Long Lasting Performance
2026-11-16
A refrigerated trailer that runs cold but breaks down early isn't just a hassle—it's a profit leak. The HFV9400XLC is built to go the distance, yet too many fleets treat service as an afterthought instead of a strategy. From defrost cycles to door seal inspections, the small habits make or break your unit's lifespan. Here's what KANGMU TRUCK recommends for keeping temperatures stable and downtime off your schedule.
Clean the Condenser Coils Before Every 500 Hours
Condenser coils are the unsung workhorses of any cooling system, quietly dumping heat so the compressor doesn't have to strain. Over time, dust, grease, and airborne debris build up on the fins, forming an insulating blanket that drives up head pressure and energy consumption. Waiting until you notice a performance drop is already too late—by the 500-hour mark, the coil has usually accumulated enough grime to reduce efficiency by 10 to 15 percent. A quick visual check after 400 hours of run time gives you a heads-up, but the 500-hour cleaning rule keeps the system predictable. If you work in a dusty or greasy environment, you might need to pull that interval forward; otherwise, stick to the schedule and the coil will repay you with lower power bills.
The cleaning process itself doesn't demand much time or special equipment. Start by disconnecting the unit and removing the outer panel so you can access the coil face. Use a soft brush or a vacuum with a brush attachment to lift off loose debris, working in the direction of the fins—never against them, or you'll bend the delicate aluminum. For stubborn oil or sap, a coil cleaner spray designed for condenser use works well, but avoid high-pressure water, which can fold the fins flat. Rinse gently with a low-flow hose and let the coil dry completely before restoring power. Many techs also carry a fin comb to straighten any bent sections after cleaning. Do this every 500 hours, log the date in your maintenance sheet, and you'll catch small problems like a slow refrigerant leak before they turn into a compressor replacement.
Pre-Cool to the Exact Setpoint, Not Just 'Cold Enough'
Setting a chiller to simply blast cold air until the room feels chilly is a shortcut that quietly undermines both product consistency and equipment lifespan. The true goal of pre-cooling is to bring the space or material to a precise thermal target before the main process begins. That target isn't a vague range of 'cold enough'—it's a specific setpoint derived from the thermal mass, ambient conditions, and the sensitivity of what you're handling. Overshooting wastes energy and can shock sensitive components, while undershooting forces the system to compensate later with unstable swings. Precision pre-cooling means the difference between a batch that behaves predictably and one that drifts into risky territory the moment real work starts.
Many operators default to maximum cooling because it feels safer, but that logic crumbles under scrutiny. If a material needs to settle at 12°C before coating or assembly, pushing the chamber to 4°C doesn't make it 'more ready'—it creates condensation, thermal stress, and a longer recovery time once the process heat kicks in. A smarter approach uses staged cooling: bring the environment down in controlled steps, monitor the rate of change, and stop exactly at the setpoint. This avoids the roller-coaster effect of overshoot-then-reheat and keeps the equipment from cycling unnecessarily. The result is a stable baseline that lets downstream operations start without waiting for temperature to rebound.
The hidden cost of 'cold enough' thinking shows up in energy bills, wear on compressors, and rejected output. A chiller that runs full-tilt to hit an arbitrary low point then idles while the space warms back up is burning power twice for no gain. By contrast, a system tuned to reach an exact setpoint uses only the cooling capacity required, holds that temperature with minimal fluctuation, and transitions smoothly into the active phase. That kind of precision isn't just a technical nicety—it's what separates a process that runs repeatably from one that keeps generating surprises. When the pre-cool stage ends at the right number, every subsequent step inherits that stability, and quality stops being a gamble.
Test Door Gaskets with a Flashlight After Every Unload
Door gaskets are easy to overlook, but they do the real work of keeping cold air in and warm air out. After every unload, take a flashlight and run it slowly along the entire seal. Even a tiny gap lets moisture and heat sneak in, which makes the compressor work harder than it should.
Do this while the door is closed. Shine the light from inside the trailer or unit, then step outside and look for any glow escaping through the gasket. Pay extra attention to the corners and the bottom edge, where wear and tear show up first. If you see light, you have a problem—no matter how small the crack looks.
Make it a habit. A quick flashlight check after each unload takes less than two minutes, but it prevents the kind of slow gasket failure that leads to temperature swings and spoiled loads. When you catch damage early, a simple adjustment or replacement keeps everything running smooth.
Stack Pallets to Keep Air Channels Clear, Not Blocked
When stacking pallets, the priority is not just stability but airflow. Blocking the natural channels between pallets can trap moisture and heat, which accelerates mold growth and weakens wooden pallets over time. Instead, leave consistent gaps between stacks and avoid placing solid objects like shrink wrap or cardboard sheets against the open ends. A simple rule of thumb: if you can't see light passing through the stack, air can't pass either. Adjust the alignment so that the stringer boards face outward and the deck boards run parallel to the main aisle, allowing cross-ventilation even in tight storage areas.
Many warehouses make the mistake of pushing pallets flush against walls or each other to save floor space. This creates dead zones where condensation builds up, especially in humid or refrigerated environments. To prevent this, maintain at least a hand's width of clearance on all sides, and use racking systems that support open-back storage. For floor-stacked pallets, rotate the orientation of each layer by 90 degrees to disrupt continuous vertical channels, which helps break up stagnant air pockets and distributes load more evenly across the stack.
Regularly inspect pallet stacks for signs of reduced airflow, such as musty odors, discoloration on inner boards, or visible dust buildup in the gaps. If you notice these indicators, reconfigure the stack immediately. Consider using pallet spacers or ventilated dividers between layers to keep channels open without sacrificing stability. Remember that a well-ventilated stack not only extends the lifespan of your pallets but also reduces the risk of slip hazards from warped or rotted wood, keeping both inventory and workers safer.
Watch for Frost Build-Up as an Early Warning Sign
Frost on your freezer walls or around the door seal isn't just a minor annoyance—it's often the first visible clue that something is off with your appliance's defrost system. When the heater element or timer starts to fail, ice crystals begin to form in odd places, like along the back panel or around the fan vents. Catching this early can save you from a full meltdown later, both literally and figuratively.
A thin layer of frost that appears overnight and keeps coming back after you scrape it away is a red flag. It means the automatic defrost cycle isn't running long enough or often enough. You might also notice the freezer working harder, with the compressor running almost nonstop. The ice acts as an insulator, making the unit less efficient and causing the temperature to creep up in the fridge section too.
Keep an eye on frost patterns. Uniform frost across the entire evaporator coil is normal, but heavy buildup only on one side or in a specific corner suggests a blocked defrost drain or a failing sensor. If you spot thick, crusty ice on the interior walls that feels spongy or wet rather than dry and flaky, it's time to check the door gasket and the defrost thermostat before the problem spreads.
Keep a Service Log for Pull-Down Times and Defrost Cycles
A handwritten notebook tucked beside the walk-in cooler beats any fancy app. Jot down the time it takes the box to drop from ambient to holding temp after the door has been open for a delivery. That pull-down window tells you if the compressor is still sharp or starting to labor. Compare it to last month’s numbers—if it creeps from twelve minutes to twenty, you have an airflow problem or a tired refrigerant charge long before spoilage shows up.
Defrost cycles are just as telling. Write down when each one starts and how long the coil stays warm. Too frequent or too long, and you are burning energy and raising product temp for no reason. Too rare, and ice builds up until the fan hits it. A simple log with date, time, and duration turns “seems off” into a clear trend you can act on.
Keep the log where anyone on shift can reach it, and make a habit of two quick entries per day. No paragraphs, just numbers and a short note. After a couple weeks, you will have a baseline that makes every future hiccup obvious—without guessing.
FAQ
Every 1,500 operating hours or at least once every three months, whichever comes first. Check refrigerant levels, drive belt tension, and clean condenser coils. Ignoring small drops in cooling efficiency usually leads to expensive compressor failures later.
Door gaskets and seals. A torn or flattened gasket lets warm air in around the loading doors, forcing the unit to work harder and causing temperature swings. Inspect them weekly by closing a dollar bill in the door—if it slides out easily, replace the seal.
Yes. Bring the box temperature down to the required set point before loading. Loading warm product into a warm trailer can raise the internal temperature beyond safe limits, and the refrigeration unit may not recover quickly enough during transit, especially in hot weather.
Check tire pressure when cold every two weeks and before long trips. Grease hub bearings on schedule and watch for any play or heat after highway runs. Proper inflation prevents sidewall flex and uneven tread wear, which reduces rolling resistance and keeps the suspension geometry stable.
Use a low-pressure wash with mild detergent and a soft brush. Avoid steam cleaning or harsh chemicals on aluminum ducts and door frames. After washing, leave the doors open until fully dry to prevent mold growth and trapped moisture from degrading the insulation panels.
Inspect the seven-pin connector for corrosion every month and test all marker lights, ABS sensors, and the liftgate if equipped. Use dielectric grease on the connector terminals. A loose ground wire is a common cause of intermittent lighting failures that can lead to fines or unsafe night operation.
Drain the fuel system or add a stabilizer if it uses a diesel engine, fully charge the battery and disconnect it, and cover the condenser to keep out debris. Run the unit once a month for 15 minutes under load if possible. In freezing climates, make sure the evaporator drain lines are clear and add RV antifreeze to the drain pan if recommended.
Perform a quick pre-trip check: listen for unusual compressor noise, confirm the set point is correct, check fuel level, and visually inspect the door seals. While driving, avoid harsh braking and sharp turns that stress the box-to-chassis mounts. Keep the reefer unit turned off when the trailer is empty and not in use to reduce unnecessary run time.
Conclusion
Keeping the HFV9400XLC in top shape means staying ahead of small problems before they become expensive ones. Start with the condenser coils: cleaning them every 500 hours is not optional if you want predictable pull-down times and a compressor that doesn't overwork. When loading, pre-cool the trailer to the exact setpoint instead of stopping at "cold enough." That small discipline keeps cargo from sweating and gives the unit a thermal head start. After every unload, run a flashlight around the door gaskets. If you see light coming through, you've found an air leak that will pull in moisture, cause frost, and waste fuel—fix it before the next trip.
Inside the box, how you stack pallets matters just as much as the refrigeration settings. Leave clear air channels along the walls and near the return air bulkhead so cold air can circulate instead of getting trapped behind a wall of product. Watch for frost build-up on the evaporator or ceiling; it's an early warning sign of a defrost fault, a damaged seal, or too much humid air entering during loading. Pair that with a simple service log tracking pull-down times and defrost cycles. Over months, that log shows gradual performance drift that a single inspection can miss. These habits won't just extend the life of the HFV9400XLC—they'll keep every load running at the right temperature without surprises.
Contact Us
Contact Person: Shen Zhikang
Email: [email protected]
Tel/WhatsApp: 8613908668969
Website: https://www.kangmutruck.com/